[Note: this is #3 in a series of tips to be published during 2009.]
Spoke wind up, twisting from end to end as the nipple is turned, is a serious menace to wheel building; blurring truing corrections and damaging a spoke at its weak points. Everyone deserves to understand the reasons why and how to stop it.
Why do spokes twist?
The main reason is friction between nipple and spoke. You turn the nipple but does it advance on the threads or twist the spoke? With aluminum nipples, the friction coefficient is high (compared to brass, the traditional nipple material). Even with lubrication, the spoke still wants to twist.
Light spokes compound the problem. The torsional rigidity of a spoke varies with the 4th power of its diameter. That means small diameter changes make for huge differences in resistance to twisting. For example, a thin butted spoke may have a diameter of 1.5 mm. This is close to half the cross sectional area of a 14 ga spoke (1.77 vs. 3.14 sq mm). The thinner spoke will be 3X more torsionally flexible.
Under good conditions, spoke windup is not an obstacle because thread friction is normally quite low, only 2-4 in-lbs. Not enough torque to twist a spoke. However, lack of lube, corrosion, and aluminum nipples can create substantial thread friction.
Windup hurts
Twisted spokes mess up a build. For example, if when you make a 1/4 turn adjustment (typical in high spec wheel building), the spoke twists 1/8 turn so the nipple only turns on the threads 1/8, you're 50% off. When centering a wheel (dishing), if some spokes are twisting, the outcome makes the wheel worse. It might require a 20 minute truing session to correct the damage. This one variable contributes heavily to the difficulty and time of building, ruining the ambitions of many beginners.
Twist also damages spoke material. The most vulnerable points are the stress risers created by threads and shape (butting and blading). If a spoke twists, the greatest damage will be done at the first thread and the transitions between larger and smaller diameter. Thin spokes are at risk of "necking" which is a plastic deformation when the metal stresses are near yield. A stretched spoke is much smaller diameter and doomed to fail.
Lastly, a spoke that is wound up will eventually unwind and a tell tale clicking, pinging noise may be heard. As these spoke are temporarily loosened during riding, they will untwist. Too often, this activity makes a straight wheel crooked. Unable (or unwilling) to control this twisting, some builders have devised schemes to release the windup before riding. Leaning on the wheel or, even, walking on it can permit the twisted spokes to become untwisted. But these procedures add time and often induce secondary damage that requires more truing.
Solutions
First, avoid dangerous situations, in so far as possible; examples: excess tension, aluminum nipples, and building dry. On the subject of tension, bear in mind that bicycle spokes were designed before super high tensions were possible. Rims of the past, wood in particular, could not support high tension. Today's rims, aluminum and composite, are stiffer and high tension is standard. That doesn't change the fact that 100 kgf is probably the highest tension that spokes are meant to support. If you build with higher, and I regularly see 120-150 kgf, the spokes will be at their limit. If you do the stress calculations for the thread root on a spoke at 150 kgf you'll see the problem. IMHO, tensions greater than 100 kgf do not generally improve wheel performance.
Second, fight friction and corrosion with thread compounds such as SpokePrep or equivalent. A good lubricant (even light oil is a huge improvement) reduces both friction and corrosion. Use any oil that is not messy and you don't mind smelling. Olive oil is fine except it might attract ants if you park in the woods. In the past, many builders used linseed oil because it later hardens into a gummy glue which helps fight vibration induced loosening. However, the wheel is not fully rideable until the oil is dry, and that might be an unacceptable (several day) period if the weather is cold.
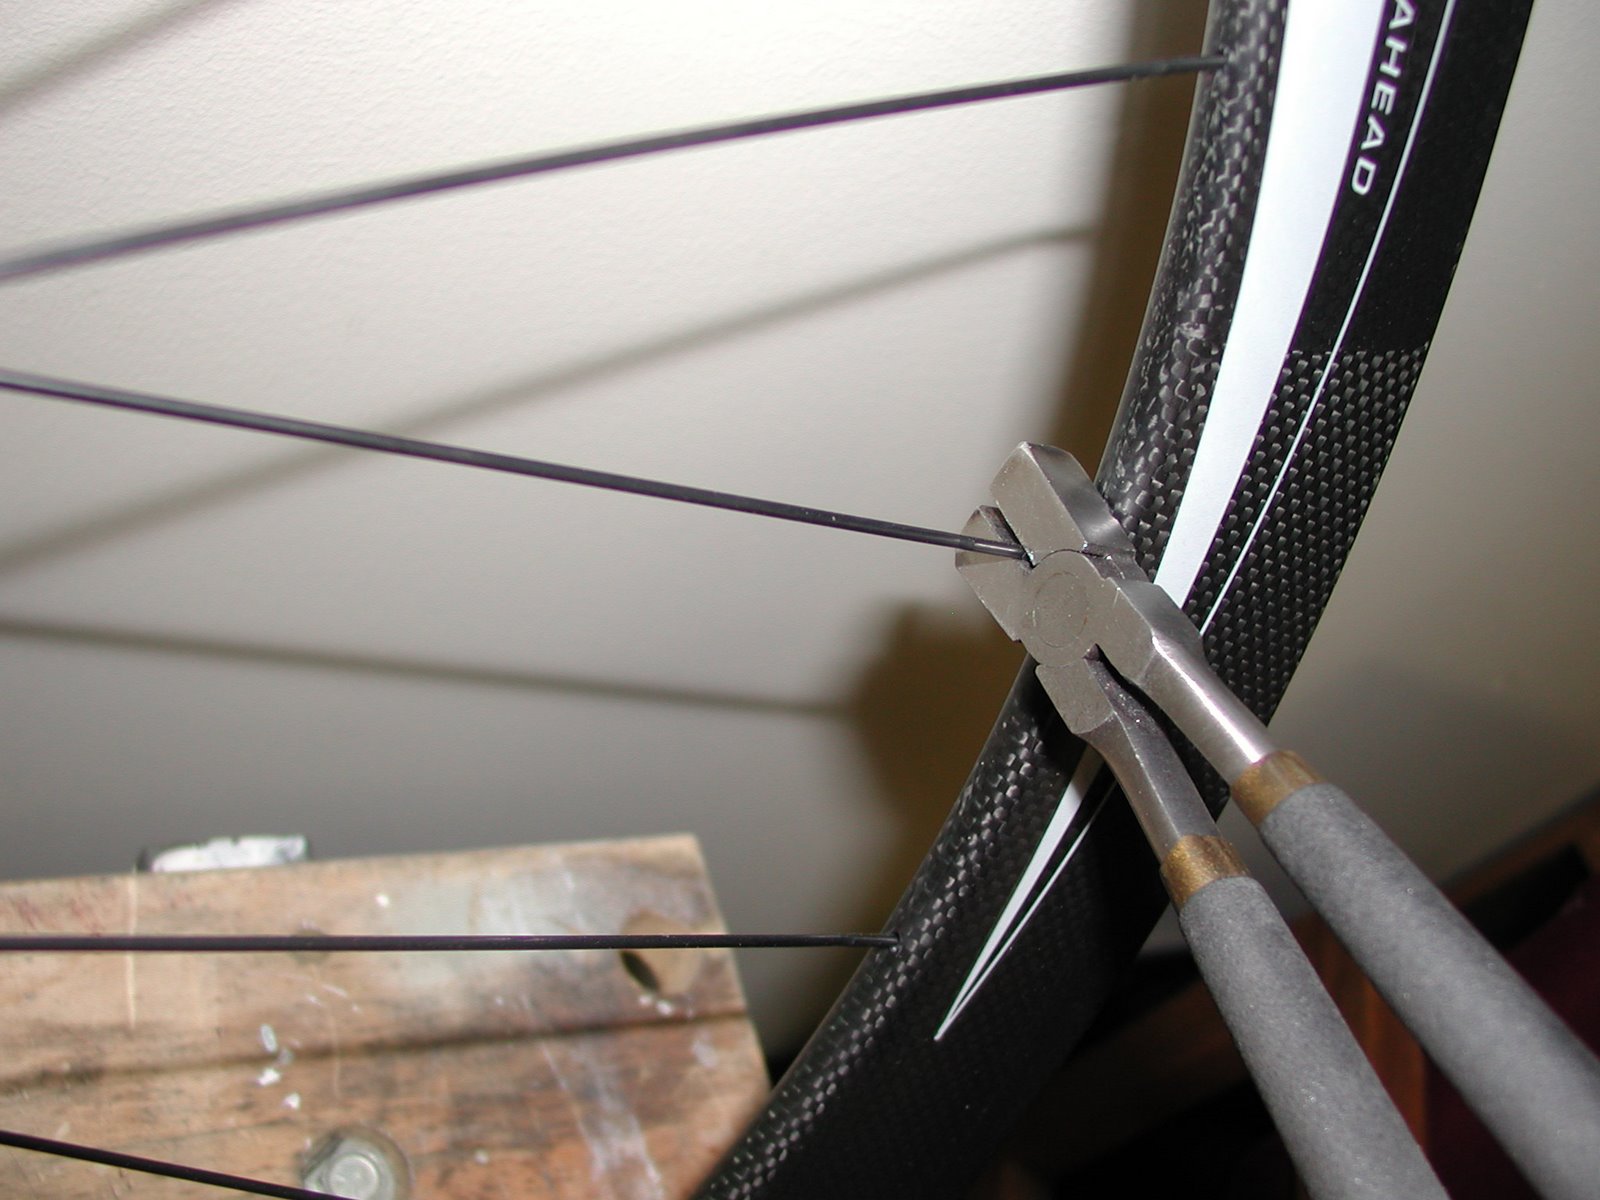
Third, hold spokes still when they try to twist. A smooth jaw plier or a brake wire pulling tool are common solutions. Make sure your toolbox has one or both.


Fourth, when turning a nipple, hold its spoke gently with your left hand (if you're right handed). This way, you can feel a spoke twisting and compensate so your adjustment is accurate. When the adjustment is finished, return the spoke to its untwisted state. On bladed spokes, windup is easy to see; but not with round spokes. But it's easy to feel with your second hand.
Fifth finish every adjustment with an automatic slight turn in the reverse direction. With experience, you'll be able to feel twist through the nipple. For example, if you just finished a 1/4 turn tightening adjustment, give the nipple a slight (1/16 or so) reverse rotation at the finish. If that reverse movement is very easy, you can be sure it's powered by a wound up spoke. Once the twist is relieved, the nipple will quickly become harder to turn, your cue to stop. Safe crackers are not the only ones with sensitive fingers. Wheel builders can and need to develop the same detection skills.


Comments will be approved before showing up.
Please fill out the following form to submit your withdrawal request.
Craig ATX
November 02, 2021
I’m looking for a solution – I have a wheel I need to retrue that the nipples won’t turn on the spokes. I can’t even loosen many of the spokes.
So if I use liquid wrench, is that enough? or will the spokes just continue to loosen?
If I do break the spokes free, has the twist ruined the spokes, causing future failure and spoke breakage?